扫盲系列 - layoutInflater中 inflate() 参数总结
动态加载布局
我们都知道加载布局,常用的两种方式
- View.inflate()
- LayoutInflater.from(context).inflate()
两种方式
可是这两个到底有啥不同呢,其实是一样的。只不过View.inflate() 进行了一层封装而已,内部实现原理,还是 通过 LayoutInflater.inflate()方法
//View.java
public static View inflate(Context context, @LayoutRes int resource, ViewGroup root) {
    LayoutInflater factory = LayoutInflater.from(context);
    return factory.inflate(resource, root);
}

//LayoutInflater.java
public View inflate(@LayoutRes int resource, @Nullable ViewGroup root) {
    return inflate(resource, root , root != null);
}
问题又来了, LayoutInflater 的 inflate() 有四个重载方法,如下图,这些到底是啥意思啊

其实 最终都会执行到了
inflate(XmlPullParser parser, @Nullable ViewGroup root, boolean attachToRoot)
这个方法里面。
//LayoutInflater.java
public View inflate(@LayoutRes int resource, @Nullable ViewGroup root) {
    return inflate(resource, root , root != null);
}

public View inflate(@LayoutRes int resource, @Nullable ViewGroup root, boolean attachToRoot) {
    final Resources res = getContext().getResources();

    final XmlResourceParser parser = res.getLayout(resource);
    try {
        return inflate(parser, root , attachToRoot);
    } finally {
        parser.close();
    }
}

public View inflate(XmlPullParser parser, @Nullable ViewGroup root) {
   return inflate(parser, root , root != null);
}
那么我们就看看这个真正的 inflate() 方法吧
inflate()
public View inflate(XmlPullParser parser, @Nullable ViewGroup root, boolean attachToRoot) {
  synchronized (mConstructorArgs) {
      Trace.traceBegin(Trace.TRACE_TAG_VIEW, "inflate");
      final Context inflaterContext = mContext;
      final AttributeSet attrs = Xml.asAttributeSet(parser);
      Context lastContext = (Context) mConstructorArgs[0];
      mConstructorArgs[0] = inflaterContext;
      View result = root;

      try {
          // Look for the root node.
          int type;
          while ((type = parser.next()) != XmlPullParser.START_TAG &&
 type != XmlPullParser.END_DOCUMENT) {
              // Empty
          }

          if (type != XmlPullParser.START_TAG) {
              throw new InflateException(parser.getPositionDescription()+ ": No start tag found!");
          }

          final String name = parser.getName();

          if (TAG_MERGE.equals(name)) {
              if (root == null || !attachToRoot) {
                  throw new InflateException("<merge /> can be used only with a valid ViewGroup root and attachToRoot=true");
              }
              rInflate(parser, root , inflaterContext , attrs , false);
          } else {
              final View temp = createViewFromTag(root, name , inflaterContext , attrs);
              ViewGroup.LayoutParams params = null;
              if (root != null) {
                  params = root.generateLayoutParams(attrs);
                  if (!attachToRoot) {
                      temp.setLayoutParams(params);
                  }
              }
              rInflateChildren(parser, temp , attrs , true);
              if (root != null && attachToRoot) {
                  root.addView(temp, params);
              }
              if (root == null || !attachToRoot) {
                  result = temp;
              }
          }

      } catch (XmlPullParserException e) {
          final InflateException ie = new InflateException(e.getMessage(), e);
          ie.setStackTrace(EMPTY_STACK_TRACE);
          throw ie;
      } catch (Exception e) {
          final InflateException ie = new InflateException(parser.getPositionDescription()
                  + ": " + e.getMessage(), e);
          ie.setStackTrace(EMPTY_STACK_TRACE);
          throw ie;
      } finally {
          // Don't retain static reference on context.
          mConstructorArgs[0] = lastContext;
          mConstructorArgs[1] = null;
          Trace.traceEnd(Trace.TRACE_TAG_VIEW);
      }
      return result;
  }
}
我们可知,
- 使用的 pull 解析
- 如果是 merge 标签的话,调用 rInflate() 循环遍历,
- 如果不是 merge 标签的话,调用 createViewFromTag() 创建 一个 View ,然后调用 rInflateChildren() ,这个内部还是调用的 rInflate() 进行遍历的
所以 rInflate() 是关键。那我们就来看看这个 rInflate() 把
rInflate()
void rInflate(XmlPullParser parser, View parent , Context context ,
 AttributeSet attrs , boolean finishInflate) throws XmlPullParserException, IOException {

    final int depth = parser.getDepth();
    int type;
    boolean pendingRequestFocus = false;

    while (((type = parser.next()) != XmlPullParser.END_TAG ||
            parser.getDepth() > depth) && type != XmlPullParser.END_DOCUMENT) {

        if (type != XmlPullParser.START_TAG) {
            continue;
        }
        final String name = parser.getName();
        if (TAG_REQUEST_FOCUS.equals(name)) {
            pendingRequestFocus = true;
            consumeChildElements(parser);
        } else if (TAG_TAG.equals(name)) {
            parseViewTag(parser, parent , attrs);
        } else if (TAG_INCLUDE.equals(name)) {
            if (parser.getDepth() == 0) {
                throw new InflateException("<include /> cannot be the root element");
            }
            parseInclude(parser, context , parent , attrs);
        } else if (TAG_MERGE.equals(name)) {
            throw new InflateException("<merge /> must be the root element");
        } else {
            final View view = createViewFromTag(parent, name , context , attrs);
            final ViewGroup viewGroup = (ViewGroup) parent;
            final ViewGroup.LayoutParams params = viewGroup.generateLayoutParams(attrs);
            rInflateChildren(parser, view , attrs , true);
            viewGroup.addView(view, params);
        }
    }
    if (pendingRequestFocus) {
        parent.restoreDefaultFocus();
    }
    if (finishInflate) {
        parent.onFinishInflate();
    }
}
如果是 focus/tag/include/merge 这四种标签,单独执行相应的方法去解析。否则 通过 createViewFromTag() 创建 一个 View , 然后添加到父布局中 。
这样循环下去。直到建立 DOM 树。
整个加载流程看明白了,现在该说说 inflate() 里面有三个参数的意义了。
inflate() 参数意义
- resource 我们知道,就是加载布局的资源 id ,这个没啥好解释的
- root 该布局外部嵌套一层父布局
这两个没啥好说的,主要是讲 attachToRoot ,这个有点意思。
attachToRoot 参数
attachToRoot 字面意思 就是 附加到 root 上,那就说明和第二个参数 root 有关咯。
先说结论,后面验证。
- root 为 null attachToRoot 将失去作用,设置任何值都没有意义。
- root 不为 null , attachToRoot 设为 true , 将 layout 布局添加到 root 布局中,不需要手动调用 addView()
- root 不为 null , attachToRoot 设为 false , 不将 layout 布局添加到 root 布局,若要添加则需要手动 addView()
- root 不为 null ,不设置 attachToRoot , attachToRoot 的默认值是 true.
例子说明
定义一个 Activity ,加载一个 activity_layoutinfalter.xml 布局,定义一个子布局 child_layout.xml,里面就一个 Button , 想法就是 在子布局中, Button 宽高设置多大,就显示多大。
// activity_layoutinfalter.xml
<?xml version="1.0" encoding="utf-8"?>
<LinearLayout xmlns:android="http://schemas.android.com/apk/res/android"
    android:id="@+id/ll_root"
    android:layout_width="match_parent"
    android:layout_height="match_parent"
    android:background="#66ff0000"
    android:orientation="vertical">

</LinearLayout>

// child_layout.xml
<?xml version="1.0" encoding="utf-8"?>
<Button xmlns:android="http://schemas.android.com/apk/res/android"
    android:id="@+id/ll_item"
    android:layout_width="200dp"
    android:layout_height="200dp"
    android:background="@color/colorPrimary"
    android:gravity="center"
    android:orientation="vertical"
    android:text="按钮" />
root 为 null , attachToRoot 无所谓
代码如下
@Override
protected void onCreate(Bundle savedInstanceState) {
   super.onCreate(savedInstanceState);
   setContentView(R.layout.activity_layoutinfalter);
   //父布局
   LinearLayout root = findViewById(R.id.ll_root);
   LayoutInflater inflater = LayoutInflater.from(this);
   View child = inflater.inflate(R.layout.child_layout, null , true);
   root.addView(child);
}
可是如图,
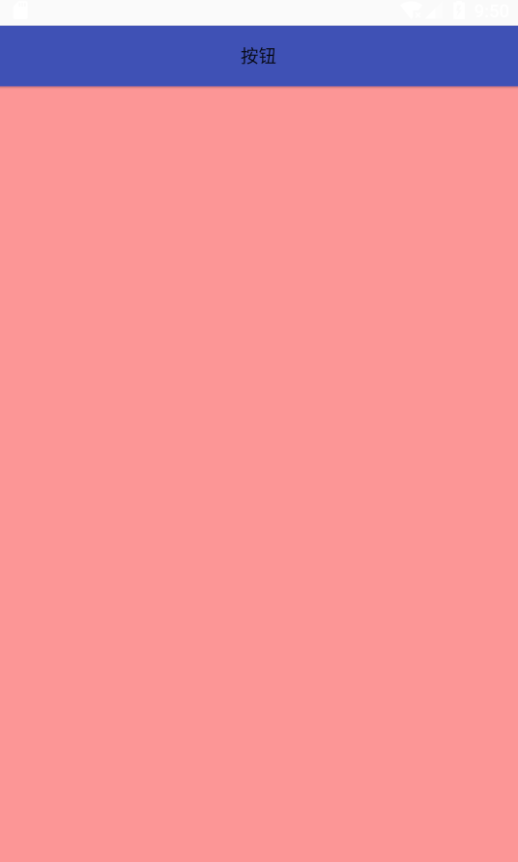
发现并不是我们想的那样, Button 尽管我们设置了 宽高都是 200dp ,可是,宽确实 match_parent ,高 是 warp_content ,这不和我们的逻辑啊。
注: 上面显示了一块白色,应该是 DecorView ,这不是重点,先不关心
root 不为 null , attachToRoot 是 false
@Override
protected void onCreate(Bundle savedInstanceState) {
   super.onCreate(savedInstanceState);
   setContentView(R.layout.activity_layoutinfalter);
   //父布局
   LinearLayout root = findViewById(R.id.ll_root);
   LayoutInflater inflater = LayoutInflater.from(this);
   View child = inflater.inflate(R.layout.child_layout, root , false);
   root.addView(child);
}
看结果
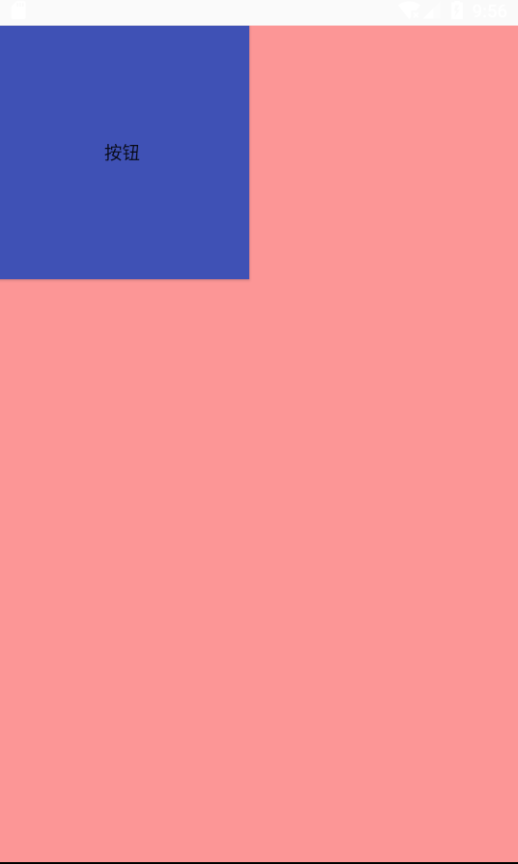 符合我们的要求,也验证了上面的结论 该 view 被添加到父 view 当中时,这些 layout 属性会自动生效。因为 layout_width 和 layout_width 并不是设置 View 的大小,而是设置 View 在布局中的大小。也就是说 View 必须存在于一个布局中, layout 属性才会生效,
通过 inflate() 源码我们也能得知
final View temp = createViewFromTag(root, name , inflaterContext , attrs);
ViewGroup.LayoutParams params = null;
if (root != null) {
    params = root.generateLayoutParams(attrs);
    if (!attachToRoot) {
        temp.setLayoutParams(params);
    }
}
root 不为 null , attachToRoot 是 true
@Override
protected void onCreate(Bundle savedInstanceState) {
   super.onCreate(savedInstanceState);
   setContentView(R.layout.activity_layoutinfalter);
   //父布局
   LinearLayout root = findViewById(R.id.ll_root);
   LayoutInflater inflater = LayoutInflater.from(this);
   View child = inflater.inflate(R.layout.child_layout, root , true);
   root.addView(child);
}
很抱歉,程序崩溃了,IllegalStateException
java.lang.IllegalStateException: The specified child already has a parent. You must call removeView() on the child's parent first.
为啥呢,如果仔细看 inflate() 中,会找到原因的。
if (root != null && attachToRoot) {
    root.addView(temp, params);
}
那是因为 当 attachToRoot 是 true 的时候,里面已经执行了 addView() ,再次执行 addView() ,不崩溃才怪呢? 所以,我们改一下,把 root.addView(child) 这行代码删掉。
@Override
protected void onCreate(Bundle savedInstanceState) {
   super.onCreate(savedInstanceState);
   setContentView(R.layout.activity_layoutinfalter);
   //父布局
   LinearLayout root = findViewById(R.id.ll_root);
   LayoutInflater inflater = LayoutInflater.from(this);
   View child = inflater.inflate(R.layout.child_layout, root , true);
  // root.addView(child);
}
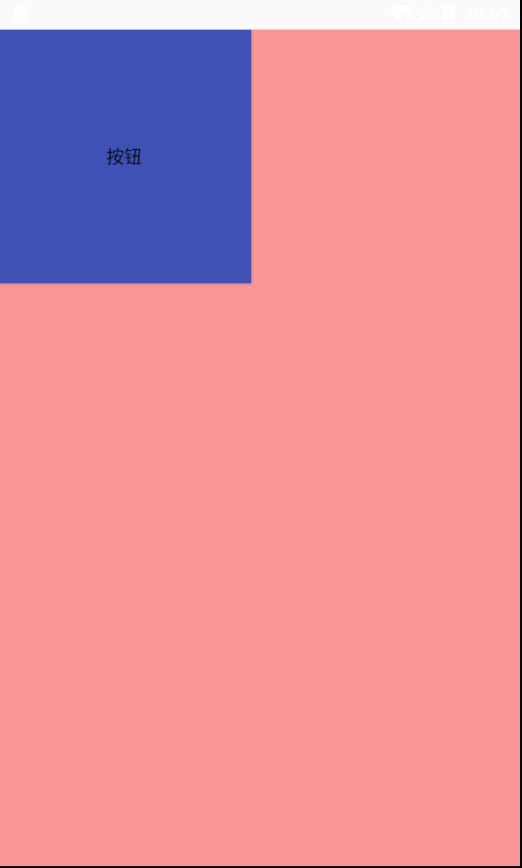 也是我们想要的效果,也验证了 上面的结论 加载的布局文件的指定一个父布局。
root 不为 null ,不设置 attachToRoot
在上面源码我们已经看出来了。
public View inflate(@LayoutRes int resource, @Nullable ViewGroup root) {
    return inflate(resource, root , root != null);
}
attachToRoot = root != null, root 不为 null ,所以 attachToRoot = true
搬运地址:
既已览卷至此,何不品评一二: