源码分析 - BlockCanary
使用
- 添加引用
dependencies { implementation 'com.github.markzhai:blockcanary-android:1.5.0' // 仅在 debug 包启用 BlockCanary 进行卡顿监控和提示的话,可以这么用 debugImplementation 'com.github.markzhai:blockcanary-android:1.5.0' releaseImplementation 'com.github.markzhai:blockcanary-no-op:1.5.0' } - 在代码中使用
public class DemoApplication extends Application {
    @Override
    public void onCreate() {
        super.onCreate();
        BlockCanary.install(this, new AppContext()).start();
    }
}

//参数设置
public class AppContext extends BlockCanaryContext {
    private static final String TAG = "AppContext";

    @Override
    public String provideQualifier() {
        String qualifier = "";
        try {
            PackageInfo info = DemoApplication.getAppContext().getPackageManager()
                    .getPackageInfo(DemoApplication.getAppContext().getPackageName(), 0);
            qualifier += info.versionCode + "_" + info.versionName + "_YYB";
        } catch (PackageManager.NameNotFoundException e) {
            Log.e(TAG, "provideQualifier exception", e);
        }
        return qualifier;
    }

    @Override
    public int provideBlockThreshold() {
        return 500;
    }

    @Override
    public boolean displayNotification() {
      //debug 模式才才开启通知栏消息
      return BuildConfig.DEBUG;
    }

    @Override
    public boolean stopWhenDebugging() {
        return false;
    }
}
BlockCanaryContext 有很多可以配置的选项,
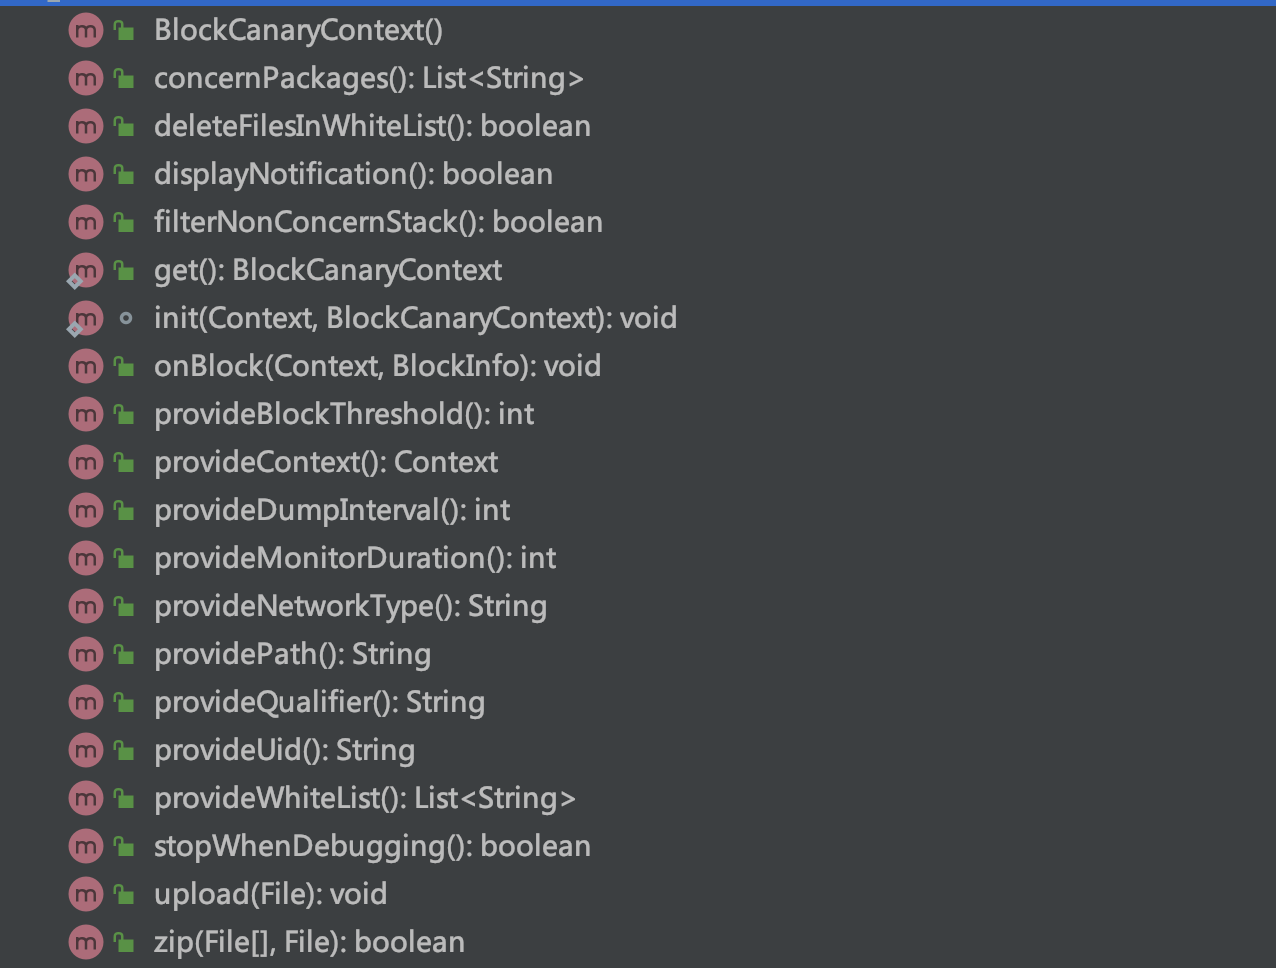 可以根据自己的实际情况选择性配置。
基本原理
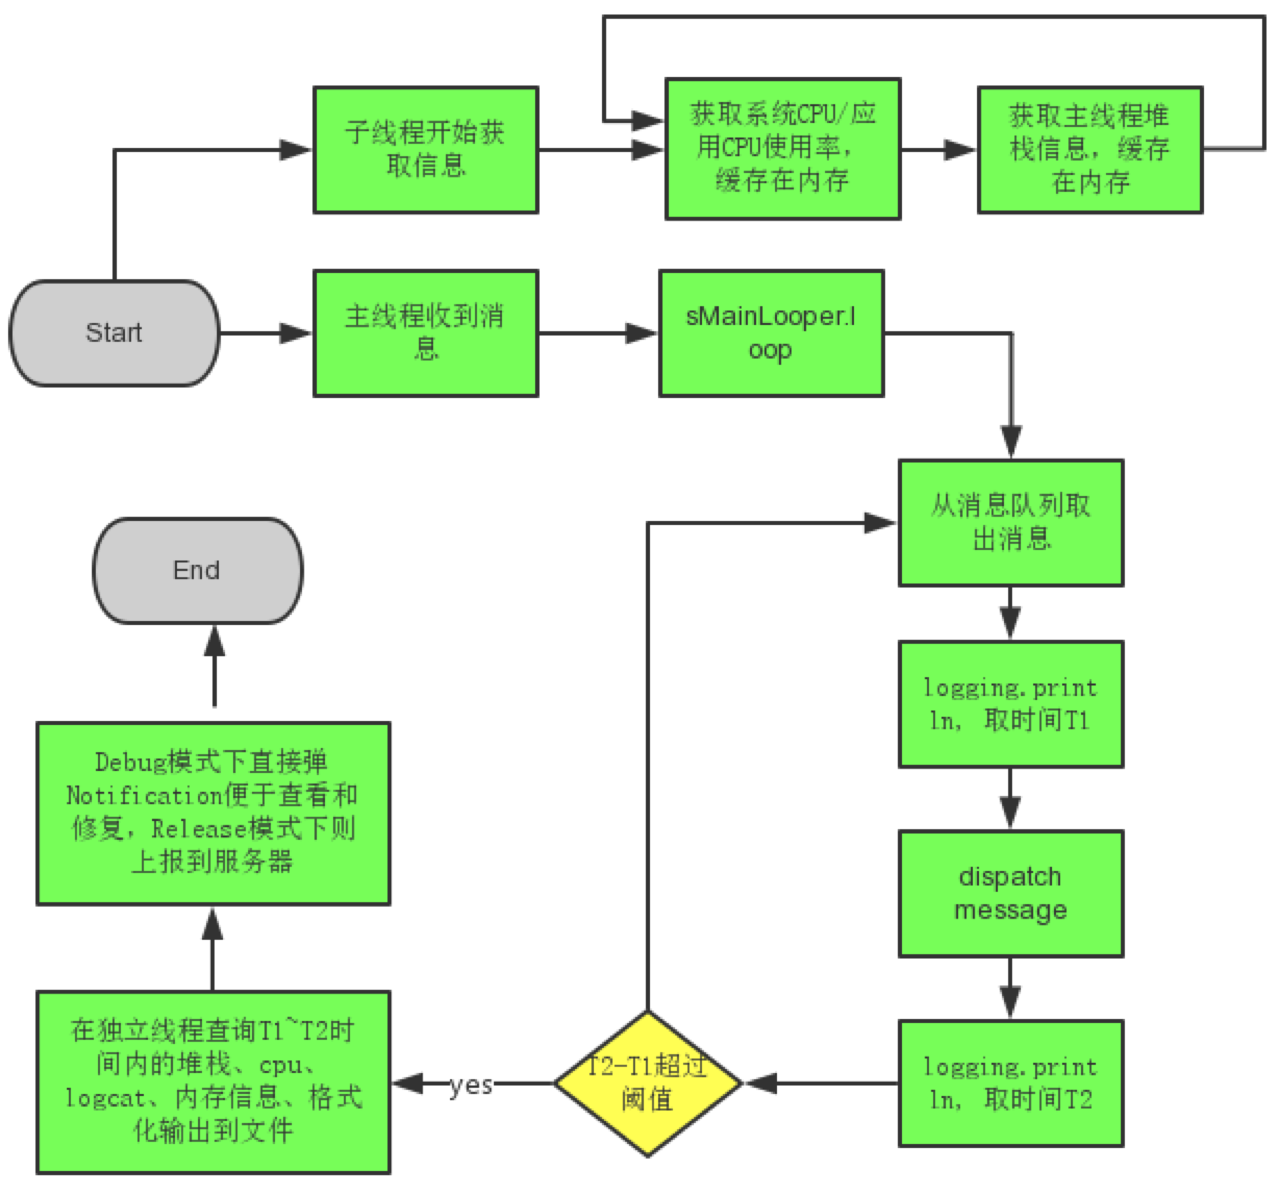
熟悉Message/Looper/Handler系列的同学们一定知道Looper.java中这么一段:不熟悉的查看 Android 消息分发机制
public static void loop() {
    ...
    for (;;) {
        ...
        Printer logging = me.mLogging;
        if (logging != null) {
            logging.println(">>>>> Dispatching to " + msg.target + " " + msg.callback + ": " + msg.what);
        }
        msg.target.dispatchMessage(msg);
        if (logging != null) {
            logging.println("<<<<< Finished to " + msg.target + " " + msg.callback);
        }
        ...
    }
}
msg.target 就是 Handler 。回调一定发生在 UI 线程
如果应用出现了卡顿,那一定是 dispatchMessage() 中执行了耗时操作。 Printer 在 dispatchMessage() 被调用,可以通过给 Looper 设置一个 Printer ,打点统计 dispatchMessage() 执行的时间,如果超出阈值,表示发生卡顿,则 dump 出各种信息。流程图如下
源码分析
通过前面的使用,我们知道,使用 BlockCanary 就一句代码
BlockCanary.install(this, new AppContext()).start()
那我们就具体看看吧
BlockCanary.install()
//BlockCanary.java
public static BlockCanary install(Context context, BlockCanaryContext blockCanaryContext) {
  //会将保存应用的 applicationContext 和用户设置的配置参数
  BlockCanaryContext.init(context, blockCanaryContext);
  //根据用户的通知栏消息配置开启或关闭 DisplayActivity
  setEnabled(context, DisplayActivity.class, BlockCanaryContext.get().displayNotification());
  //外观类 BlockCanary 的创建过程
  return get();
}
DisplayActivity 是承载通知栏消息的activity
BlockCanaryContext.get().displayNotification() 默认是 true ,我们在使用的时候返回的是 BuildConfig.DEBUG,即只有在 debug 模式下才会开启。
init() 就不需要解释了,主要看 setEnabled() 和 get()
BlockCanary # setEnabled()
private static void setEnabled(Context context, final Class<?> componentClass, final boolean enabled) {
    final Context appContext = context.getApplicationContext();
    //提交到一个单线程的 IO 线程池去执行
    executeOnFileIoThread(new Runnable() {
        @Override
        public void run() {
            setEnabledBlocking(appContext, componentClass , enabled);
        }
    });
}

private static void setEnabledBlocking(Context appContext, Class<?> componentClass, boolean enabled) {
   ComponentName component = new ComponentName(appContext, componentClass);
   PackageManager packageManager = appContext.getPackageManager();
   int newState = enabled ? COMPONENT_ENABLED_STATE_ENABLED : COMPONENT_ENABLED_STATE_DISABLED;
   packageManager.setComponentEnabledSetting(component, newState , DONT_KILL_APP);
}
把 DisplayActivity 这个最贱启用,这个和 LeakCanary 中那个类似
BlockCanary # get()
public static BlockCanary get() {
    if (sInstance == null) {
        synchronized (BlockCanary.class) {
            if (sInstance == null) {
                sInstance = new BlockCanary();
            }
        }
    }
    return sInstance;
}
private BlockCanary() {
    BlockCanaryInternals.setContext(BlockCanaryContext.get());
    mBlockCanaryCore = BlockCanaryInternals.getInstance();
    mBlockCanaryCore.addBlockInterceptor(BlockCanaryContext.get());
    //不需要显示到状态栏上,就不在执行了
    if (!BlockCanaryContext.get().displayNotification()) {
        return;
    }
    mBlockCanaryCore.addBlockInterceptor(new DisplayService());
}
- 单例模式,得到一个 BlockCanary 对象
- 核心处理类为BlockCanaryInternals
- 添加了两个BlockInterceptor :BlockCanaryContext 和 DisplayService 。
BlockCanaryInternals 初始化
也是一个单例,执行到私有构造函数
public BlockCanaryInternals() {
    //线程堆栈采样
    stackSampler = new StackSampler(Looper.getMainLooper().getThread(),sContext.provideDumpInterval());
    //CPU采样
    cpuSampler = new CpuSampler(sContext.provideDumpInterval());
    //创建一个LooperMonitor
    setMonitor(new LooperMonitor(new LooperMonitor.BlockListener() {
        @Override
        public void onBlockEvent(long realTimeStart, long realTimeEnd , long threadTimeStart , long threadTimeEnd) {
            //当出现 block 的时候处理
        }
    }, getContext().provideBlockThreshold(), getContext().stopWhenDebugging()));
    LogWriter.cleanObsolete();
}
LooperMonitor 实现了android.util.Printer接口。随后通过调用 setMonitor 把创建的 LooperMonitor 赋值给 BlockCanaryInternals 的成员变量 monitor 。
初始化就完成了,然后就调用了 BlockCanary 的start()
BlockCanary#start()
public void start() {
     if (!mMonitorStarted) {
         mMonitorStarted = true;
         Looper.getMainLooper().setMessageLogging(mBlockCanaryCore.monitor);
     }
  }
将 BlockCanaryInternals 中保存的 LooperMonitor 对象 monitor 给主线程 Looper 的 mLogging 变量赋值。
//Looper.java
public void setMessageLogging(@Nullable Printer printer) {
    mLogging = printer;
}
这个 mLogging 会在 loop() 中使用到。
//Looper
for (;;) {
    Message msg = queue.next();
    Printer logging = me.mLogging;
    if (logging != null) {
        logging.println(">>>>> Dispatching to " + msg.target + " " +msg.callback + ": " + msg.what);
    }

    msg.target.dispatchMessage(msg);

    if (logging != null) {
        logging.println("<<<<< Finished to " + msg.target + " " + msg.callback);
    }
    ...
}
me.mLogging 就是我们设置的 LooperMonitor 对象 monitor ,不为 null ,这样主线程 Looper 在消息分发前后使用LooperMonitor#println输出日志。
然后我们看看 LooperMonitor#println(),对于单个 Message ,这个方法一定是成对调用的,
LooperMonitor#println()
public void println(String x) {
    if (mStopWhenDebugging && Debug.isDebuggerConnected()) {
        return;
    }
    if (!mPrintingStarted) {
      //第一次调用,也就是 dispatchMessage() 执行之前 mPrintingStarted 为 false ,记录开始时间,
        mStartTimestamp = System.currentTimeMillis();
        mStartThreadTimestamp = SystemClock.currentThreadTimeMillis();
        //mPrintingStarted 设置为 true ,保证下一次的时候不走到这里。
        mPrintingStarted = true;
        //开始 dump 堆栈和 CPU 信息。
        startDump();
    } else {
        //第二次调用,也就是 dispatchMessage() 执行之后,在此记录时间
        final long endTime = System.currentTimeMillis();
        //mPrintingStarted 设置为 false ,保证下一次的时候不走到这里。
        mPrintingStarted = false;
        //判断是否出现卡顿
        if (isBlock(endTime)) {
            notifyBlockEvent(endTime);
        }
        //停止 dump 堆栈和 CPU 信息
        stopDump();
    }
}
mStopWhenDebugging 是在我们定义的 AppContext 的 stopWhenDebugging() 中的值,即 false ,所以继续执行,
private boolean isBlock(long endTime) {
    return endTime - mStartTimestamp > mBlockThresholdMillis;
}
mBlockThresholdMillis 就是我们定义的 AppContext 的 provideBlockThreshold() 中设置的值,即500ms 如果出现卡顿,则执行notifyBlockEvent()
卡顿处理
private void notifyBlockEvent(final long endTime) {
    final long startTime = mStartTimestamp;
    final long startThreadTime = mStartThreadTimestamp;
    final long endThreadTime = SystemClock.currentThreadTimeMillis();
    //得到一个 HandlerThread ,然后开始处理卡顿,所以这个不会影响 UI 的
    HandlerThreadFactory.getWriteLogThreadHandler().post(new Runnable() {
        @Override
        public void run() {
            mBlockListener.onBlockEvent(startTime, endTime , startThreadTime , endThreadTime);
        }
    });
}
mBlockListener 就是在 BlockCanaryInternals() 构造函数中, setMonitor() 中创建的匿名函数。 onBlockEvent() 是在一个子线程中执行的
public void onBlockEvent(long realTimeStart, long realTimeEnd , long threadTimeStart , long threadTimeEnd) {
    ArrayList<String> threadStackEntries = stackSampler.getThreadStackEntries(realTimeStart, realTimeEnd);
    if (!threadStackEntries.isEmpty()) {
      //将堆栈采样和 CPU 采样数据封装为一个 BlockInfo 。
        BlockInfo blockInfo = BlockInfo.newInstance()
                .setMainThreadTimeCost(realTimeStart, realTimeEnd , threadTimeStart , threadTimeEnd)
                .setCpuBusyFlag(cpuSampler.isCpuBusy(realTimeStart, realTimeEnd))
                .setRecentCpuRate(cpuSampler.getCpuRateInfo())
                .setThreadStackEntries(threadStackEntries)
                .flushString();
        //将卡顿发生时的堆栈和 CPU 信息写入日志;
        LogWriter.save(blockInfo.toString());
        //如果开启走通知栏,那么将发出一条通知栏消息
        if (mInterceptorChain.size() != 0) {
            for (BlockInterceptor interceptor : mInterceptorChain) {
                interceptor.onBlock(getContext().provideContext(), blockInfo);
            }
        }
    }
}
主要就干了三件事
- 将堆栈采样和 CPU 采样数据封装为一个 BlockInfo 。
- 将卡顿发生时的堆栈和 CPU 信息写入日志
- 如果开启走通知栏,那么将发出一条通知栏消息
封装 BlockInfo 就没啥好说的,直接看写入日志吧
卡顿信息写入日志
//LogWriter.java
public static String save(String str) {
    String path;
    synchronized (SAVE_DELETE_LOCK) {
        path = save("looper", str);
    }
    return path;
}

private static String save(String logFileName, String str) {
        String path = "";
        BufferedWriter writer = null;
        try {
            // blocakcanary保存日志的路径,可以在 AppContext 中配置,默认是 /blockcanary/下面
            File file = BlockCanaryInternals.detectedBlockDirectory();
            long time = System.currentTimeMillis();
            //文件名
            path = file.getAbsolutePath() + "/"+ logFileName + "-" + FILE_NAME_FORMATTER.format(time) + ".log";
            OutputStreamWriter out = new OutputStreamWriter(new FileOutputStream(path, true), "UTF-8");
            writer = new BufferedWriter(out);
            //通过流写入文件中
            ...
          }
        return path;
    }
因为是 onBlockEvent() 是在 HandlerThread 中执行的,所以写文件就不需要再开子线程了。
通知栏消息
接下来看通知栏消息 也就是
if (mInterceptorChain.size() != 0) {
    for (BlockInterceptor interceptor : mInterceptorChain) {
        interceptor.onBlock(getContext().provideContext(), blockInfo);
    }
}
mInterceptorChain 中的数据是在 BlockCanary 中添加的,就是 BlockCanaryContext.get() 和 DisplayService 这两个,而 BlockCanaryContext.get()中对 onBlock() 是空实现。所以主要关注的就是 DisplayService 的 onBlock()
DisplayService #onBlock()
@Override
public void onBlock(Context context, BlockInfo blockInfo) {
    Intent intent = new Intent(context, DisplayActivity.class);
    intent.putExtra("show_latest", blockInfo.timeStart);
    intent.setFlags(Intent.FLAG_ACTIVITY_NEW_TASK | Intent.FLAG_ACTIVITY_CLEAR_TOP);
    PendingIntent pendingIntent = PendingIntent.getActivity(context, 1 , intent , FLAG_UPDATE_CURRENT);
    String contentTitle = context.getString(R.string.block_canary_class_has_blocked, blockInfo.timeStart);
    String contentText = context.getString(R.string.block_canary_notification_message);
    show(context, contentTitle , contentText , pendingIntent);
}

private void show(Context context, String contentTitle , String contentText , PendingIntent pendingIntent) {
        NotificationManager notificationManager = (NotificationManager) context.getSystemService(Context.NOTIFICATION_SERVICE);

        Notification notification;
        if (SDK_INT < HONEYCOMB) {
          ...
        } else {
          ..
        }
        notificationManager.notify(0xDEAFBEEF, notification);
    }
这里面就是发送了通知栏消息,点击这个通知栏,然后跳转到了 DisplayActivity 这个界面显示具体 Block 信息。
dump 信息
dump 的信息包括:
- 基本信息:安装包标示、机型、api等级、uid、CPU内核数、进程名、内存、版本号等
- 耗时信息:实际耗时、主线程时钟耗时、卡顿开始时间和结束时间
- CPU信息:时间段内 CPU 是否忙,时间段内的系统CPU/应用 CPU 占比,I/O占 CPU 使用率
- 堆栈信息:发生卡慢前的最近堆栈,可以用来帮助定位卡慢发生的地方和重现路径
如下图

搬运地址:
既已览卷至此,何不品评一二: